MidTBot: Difference between revisions
From TSAS Library
JStallings (talk | contribs) No edit summary |
JStallings (talk | contribs) No edit summary |
||
| Line 9: | Line 9: | ||
## Choose Tools > Boards > Board Manager, choose "esp32" by Espressif | ## Choose Tools > Boards > Board Manager, choose "esp32" by Espressif | ||
## Choose Tools > Boards > ESP32 Arduino > "ESP32 Dev Module" | ## Choose Tools > Boards > ESP32 Arduino > "ESP32 Dev Module" | ||
# Copy contents of "Libraries" folder in Esp32 firmware downloaded above to Arduino's | ## Choose Sketch > Include Library > Manage Libraries, search "TMCStepper" from teemuatlut | ||
# | ## Copy contents of "Libraries" folder in Esp32 firmware downloaded above to Arduino's Library folder | ||
## Choose File > Open, find Grbl_Esp32 folder downloaded above, open "Grbl_Esp32.ino" within '''Note that only one file will open within the IDE''' | |||
# Edit Grbl_Esp32-main\Grbl_Esp32\src\Machine.h, replacing <pre>#include "Machines/test_drive.h"</pre> with <pre>#include "Machines/midtbot.h"</pre> then save | |||
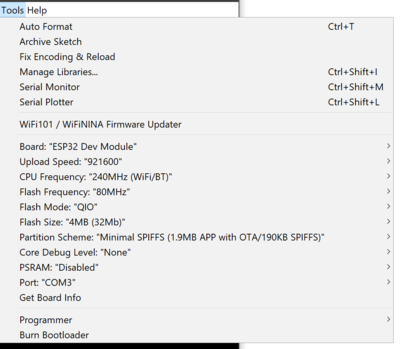
# Match settings to image [[File:grblArduinoSettings.png|400px|right]] | |||
# Compile and upload | |||
'''Important''' Watch the compilation process. Once it is complete, the monitor at the bottom will display "Connecting...." When this happens, press and hold the "BOOT" or "IOO" button on the ESP32 until "Writing at..." is displayed. | |||
# Choose Tools > Serial Monitor and press the EN (reset) button on the ESP32. If output is garbled, check that baud rate in the monitor is 115200 | |||
# Continue instructions on [https://github.com/bdring/midTbot_esp32/wiki Dring's midTbot Wiki] | |||
# Connect to web server "GRBL_ESP" with p/w 12345678 | # Connect to web server "GRBL_ESP" with p/w 12345678 | ||
Revision as of 13:32, 18 March 2021
Setup
- Print 3d parts from Thingiverse
- Collect hardware from BOM—note the ESP32 is the dev version
- Purchase controller from Bart Dring's Tindie store
- Assemble it
- Download GRBL Esp32 firmware and unzip
- Download and install Arduino IDE
- Open Arduino IDE. Preferences > copy stable release link to Additional Boards Manager URLs field.
- Choose Tools > Boards > Board Manager, choose "esp32" by Espressif
- Choose Tools > Boards > ESP32 Arduino > "ESP32 Dev Module"
- Choose Sketch > Include Library > Manage Libraries, search "TMCStepper" from teemuatlut
- Copy contents of "Libraries" folder in Esp32 firmware downloaded above to Arduino's Library folder
- Choose File > Open, find Grbl_Esp32 folder downloaded above, open "Grbl_Esp32.ino" within Note that only one file will open within the IDE
- Edit Grbl_Esp32-main\Grbl_Esp32\src\Machine.h, replacing
#include "Machines/test_drive.h"
with#include "Machines/midtbot.h"
then save - Match settings to image
- Compile and upload
Important Watch the compilation process. Once it is complete, the monitor at the bottom will display "Connecting...." When this happens, press and hold the "BOOT" or "IOO" button on the ESP32 until "Writing at..." is displayed.
- Choose Tools > Serial Monitor and press the EN (reset) button on the ESP32. If output is garbled, check that baud rate in the monitor is 115200
- Continue instructions on Dring's midTbot Wiki
- Connect to web server "GRBL_ESP" with p/w 12345678
- index.html.gz is located in the .../data folder of /Grbl_Esp32-master
- Continue instructions here
Troubleshooting
Can't find "#define CPU_MAP_ESP32"?
Change #define CPU_MAP_ESP3 to #define CPU_MAP_MIDTBOT instead.
Won't connect when compiling (Windows)?
Change cable several times, checking Device Manager for changes. If still no response, install "CP210x USB to UART Bridge VCP Drivers" from ESP32.net
Missing library?
Double-check that the contents of the "Library" folder in the Grbl_ESP32.zip file pulled from github are copied to the libraries folder ...Documents/Arduino/libraries.
"Hard resetting via RTS pin"?
It's done.
