Gradebook

Logging In
- Head to Wen-GAGE grade book
- Enter your username (first initial, last name) and password
- Choose "Instructor Gradebook" for desktop access or "Instructor Gradebook Mobile" for phone access
Getting Oriented (Desktop)

This screen is full of rarely useful information. The top tells you what trimester you are editing (helpful around the trimester change). Below that is a link to change your password. Do this during your first log in. The "Resources" box contains a help guide under "Documentation." Godspeed if you care to attempt the training videos. Student information will appear below "Adds/Drops/Suspensions" if you have a student in one of those situations. We do not deliver announcements through this website.
The three buttons at the bottom (and "Options," up top) are explained below.
Taking Attendance (Desktop)
- Click the Attendance Icon on the left, third from the bottom
- The date in the upper left corner defaults to the present day. If you are altering attendance for a different day, you will need to change it.
- The View Type radio buttons will change the display of the students:
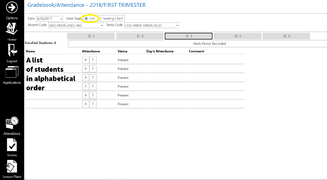
Choosing "List" will display an alphabetical list
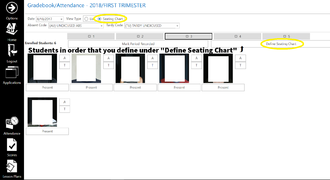
Choosing "Seating Chart" will display them in the order you define
- Choose the class you wish to mark using the numbered buttons near the top.
- In either mode, pressing "A" will mark the student absent, marking "T" will mark them tardy.
- When a student is marked absent, another button will appear. Pressing "P" will mark the student present.
- The button below the student indicates their current status. Pressing it will display the student's status in previous classes that day.
- If all students are present, press "Mark Period Recorded" underneath the hour buttons.
- You know you have been successful when a check mark appears next to the hour in the button up top.


Entering Grades (Desktop)
- On any screen, click "Scores" in the bottom left
- Choose the class up top
Creating Lesson Plans (Desktop)
Wen-GAGE allows you to copy lesson plans (and the assignments therein) between classes and school years. This is a great time saver, but takes a bit of preparation up front. Some definitions to make things clear:
Section group: any number of identical courses that share a structure and (some or all) assignments. E.g. Biology I will not share a section group with Biology II
Lesson plan: a unit of time within a course that contains assignments. Note that all assignments must be contained within a lesson plan, but your lesson plan may span the entire trimester
Assignment type: a classification that allows you to weight assignments (e.g. the "Test" type may count for 10% of the final grade). Note that you do not need to weight the assignments, but they must all have a type. You may also choose a color for each type here
Take a minute to plan broadly your grading policy and assignment structure for the course. What kind of assignments will you give? Do you want to weight tests or projects differently, or just use a point system? Do you want to enter percentages in the grade book, or point values?
Creating a section group

- On any screen, click "Lesson Plans" in the bottom left
- Click "Manage Section Groups" up top
- Click "New" on the right, unless you are editing an old group
- Name the group—usually the name and section of the course, e.g. Spanish II 1/2
- Press "Add New" below and to the right
- Enter a description for your first assignment type. This may be "Homework," "Lab reports," or "Final Exam"
- Enter a weight. If you will not use a percentage weighting system, leave it at zero
- Choose colors if you're feeling creative. Note "Fore color" is the text color
- Repeat steps 5–8 as necessary
- Press "Save" if you have completed all of your groups, press "Save & Add" to close this one and open a new, blank one
Assigning sections to a section group
- Click "Assign Sections to Groups" up top
- Use the drop-down menu next to each course to assign it to a section group. This displays all of your courses for this year. You need only assign those you are teaching immediately, but feel free to assign all identical classes to their groups now. (LIBRARY AIDE Per:1 Crs:7850 Sec:039 Ses:1-1 is the class Library Aide, period 1, session 1)
- Press the tiny Save button in the upper right before moving on
Creating lesson plans
As defined above, a lesson plan is defined by a start date and an end date, and every assignment must be within a lesson plan. If you prefer to not divide up the trimester this way, you may create one "Default" lesson plan for the entire trimester.

- Choose the class you wish to create a lesson plan for, then click "Lesson Plans," below
- Title the plan ("Knitting Two-at-Once Mittens," "Fractions," "The Romantic Era," "Default")
- The box below is a rich-text editor, and anything you put within will be seen by students and their parents. Descriptions can be very helpful
- Below are all courses you assigned to this course's section group. The check boxes allow you to include or exclude this lesson plan from each.
- If you're using the check boxes often, you likely should separate those courses with different section groups
- The begin and end dates default to the first and last days of each session. If you wish to change these, make sure you choose a day we are in class
- The "Apply Selected Section Dates to Other Sections" button will calculate the number of days you have chosen and apply that to the classes in other sessions