Slicing 3D Print Files: Difference between revisions
JStallings (talk | contribs) No edit summary |
(Added link to filament diameter) |
||
| (46 intermediate revisions by one other user not shown) | |||
| Line 1: | Line 1: | ||
You have found or [[3D Printing Badge|created]] | [[File:SlicedModel.gif|frame|right|Model sliced in Cura]] | ||
You have found or [[3D Printing Badge|created]] a 3D model and saved it as an .stl file. | |||
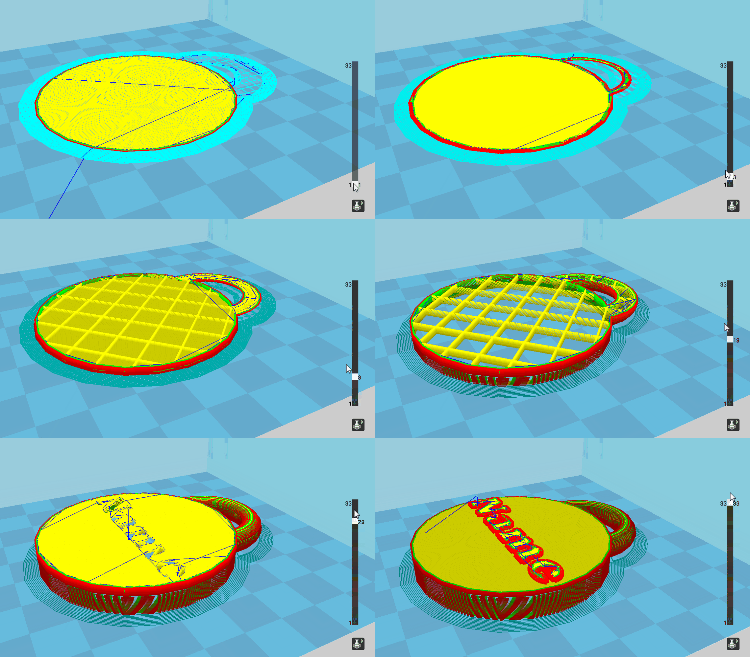
# Download and install or open Cura [[File:Curaicon.png|20px|Cura icon]] | The next step is to slice the file into layers that the 3D printer will follow when creating your object. The gif to the left illustrates the layers that your model will be sliced into. Notice the blue colored support under the handle; without that, the handle would have nothing supporting it during printing. The video below shows us what can happen without proper support. | ||
# On first install, you'll need to set up the | ===Setup Cura=== | ||
# Download settings file [https://drive.google.com/file/d/0B72Ssp8dW8t5Si1WZFlPQlBBVW8/view here]. (It is safe; I made it | # [https://ultimaker.com/en/products/21432-cura-15046 Download and install] or open Cura [[File:Curaicon.png|20px|Cura icon]]. (Note: We must use an older edition, 15.04.6, at the school. Mac/Linux versions [https://ultimaker.com/en/products/cura-software/list here]) | ||
# Go to "File," select "Open Profile," then | # On first install, you'll need to set up the machine. Choose PrintrBot, then Play when prompted | ||
# Download settings file [https://drive.google.com/file/d/0B72Ssp8dW8t5Si1WZFlPQlBBVW8/view here]. (It is safe; I made it) | |||
# Go to "File," select "Open Profile," then open the settings file you downloaded | |||
===Cura Settings=== | |||
# | ====Layer height, shell thickness, and fill density==== | ||
These settings affect the smoothness of your print, the thickness of the walls and top, and the amount of material inside. | |||
<gallery mode=nolines widths=300px> | |||
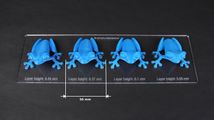
File:3dprintlayerheight.jpg|Layer height settings determine the smoothness of the sides of a print. We can print at .26 because the tag is mostly "top" or "bottom." | |||
File:3dprintshellthickness.png|Shell thickness settings are multiples of the printer's nozzle size. Ours is .4mm. A good thickness for this print is .8mm for the shell (side) thickness and the top/bottom thickness. | |||
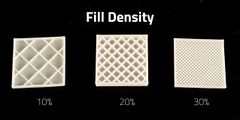
File:3dprintfilldensity.jpg|Fill density settings. Notice that 30% is nearly solid; I used 55% when building the giant CNC and could not see through it. For our uses, 10% is more than enough! | |||
</gallery> | |||
====Brim and Support==== | |||
The next settings we need to change ensure that the model sticks to the bed and any hanging pieces (like the handle on your name tag) are well-supported. | |||
<span style="float:left;margin-right:10px;">{{#widget:YouTube|id=HVdvKfIHtS0|width=560|height=315|float=right}}</span> | |||
Notice that the legs do not stay in place without a brim, which is just a series of circles made by the printer to give the model stronger hold to the bed. These are easily removed after printing. | |||
Even with a set of brims, this model fails to print properly because the horse's stomach has no support. The melted plastic just droops into a spaghetti mess. | |||
With brims and support, however, the horse prints just fine. Like the brim, support structures can be easily removed from the model after printing. | |||
Note that support is not always needed! A pyramid has no overhanging pieces, so does not need to have support. You can turn off these settings in Cura on the left menu. | |||
Open Cura and load your name tag. In the settings screen on the left, change Support type to "Everywhere," and the Platform adhesion type to "Brim." Now your name tag will stick to the print bed and the handle will be crisp and supported! | |||
====Summary of Settings==== | |||
[[File:Printrbotsettings4.png|left|Our Cura settings for PrintrBot Play]] | |||
<span style="float:left;"> | |||
{| | |||
|- | |||
|Layer height (mm) | |||
|.26 | |||
|- | |||
|Shell thickness | |||
|.8 | |||
|- | |||
|Enable retraction | |||
|(checked) | |||
|- | |||
|Bottom/Top thickness (mm) | |||
|.8 | |||
|- | |||
|Fill density (%) | |||
|10 | |||
|- | |||
|Print speed (mm/s) | |||
|50 | |||
|- | |||
|Printing temperature (C) | |||
|210 | |||
|- | |||
|Support type | |||
|Everywhere | |||
|- | |||
|Platform adhesion type | |||
|Brim | |||
|- | |||
|Diameter | |||
|Check the [[Filament Diameter]] chart | |||
|- | |||
|Flow (%) | |||
|95.0 | |||
|- | |||
|Nozzle size | |||
|0.4 | |||
|}</span> | |||
<br style="clear:both" /> | |||
===Check the Quality=== | |||
# With the model selected, click View Mode in the top right, and choose Layer | # With the model selected, click View Mode in the top right, and choose Layer | ||
# This shows the layers created by the slicer. Can you read the letters? If not, scale up your badge. If you scale it to the max and still can't read it, rebuild the badge with larger text | # This shows the layers created by the slicer. Can you read the letters? If not, scale up your badge. If you scale it to the max and still can't read it, rebuild the badge with larger text | ||
# Press the save button on the middle top, and name your file with your name, a description, and the color you want, e.g. paul badge black.gcode | |||
===Save the .gcode File=== | |||
# Press the save button on the middle top, and name your file with your name, a description, and the color you want, e.g. <code>paul badge black.gcode</code> | |||
{| class="wikitable" style="margin:auto;" | |||
!colspan="2"|3D Print Training Series | |||
|- | |||
|Previously: Making the [[3D Printing Badge]] ||Next up: Using [[OctoPrint]] | |||
|} | |||
[[Category:Maker Space]] | |||
[[Category:3D Printing]] | |||
Latest revision as of 14:16, 13 December 2017
You have found or created a 3D model and saved it as an .stl file.
The next step is to slice the file into layers that the 3D printer will follow when creating your object. The gif to the left illustrates the layers that your model will be sliced into. Notice the blue colored support under the handle; without that, the handle would have nothing supporting it during printing. The video below shows us what can happen without proper support.
Setup Cura
- Download and install or open Cura
 . (Note: We must use an older edition, 15.04.6, at the school. Mac/Linux versions here)
 - On first install, you'll need to set up the machine. Choose PrintrBot, then Play when prompted
- Download settings file here. (It is safe; I made it)
- Go to "File," select "Open Profile," then open the settings file you downloaded
Cura Settings
Layer height, shell thickness, and fill density
These settings affect the smoothness of your print, the thickness of the walls and top, and the amount of material inside.
Brim and Support
The next settings we need to change ensure that the model sticks to the bed and any hanging pieces (like the handle on your name tag) are well-supported.
Notice that the legs do not stay in place without a brim, which is just a series of circles made by the printer to give the model stronger hold to the bed. These are easily removed after printing.
Even with a set of brims, this model fails to print properly because the horse's stomach has no support. The melted plastic just droops into a spaghetti mess.
With brims and support, however, the horse prints just fine. Like the brim, support structures can be easily removed from the model after printing.
Note that support is not always needed! A pyramid has no overhanging pieces, so does not need to have support. You can turn off these settings in Cura on the left menu.
Open Cura and load your name tag. In the settings screen on the left, change Support type to "Everywhere," and the Platform adhesion type to "Brim." Now your name tag will stick to the print bed and the handle will be crisp and supported!
Summary of Settings
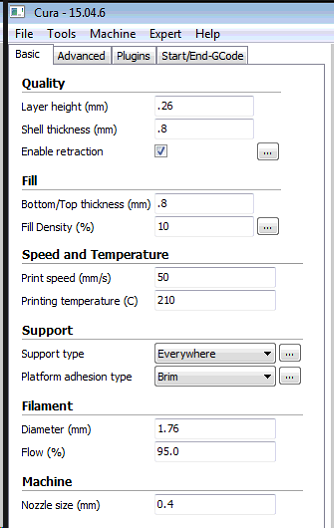
| Layer height (mm) | .26 |
| Shell thickness | .8 |
| Enable retraction | (checked) |
| Bottom/Top thickness (mm) | .8 |
| Fill density (%) | 10 |
| Print speed (mm/s) | 50 |
| Printing temperature (C) | 210 |
| Support type | Everywhere |
| Platform adhesion type | Brim |
| Diameter | Check the Filament Diameter chart |
| Flow (%) | 95.0 |
| Nozzle size | 0.4 |
Check the Quality
- With the model selected, click View Mode in the top right, and choose Layer
- This shows the layers created by the slicer. Can you read the letters? If not, scale up your badge. If you scale it to the max and still can't read it, rebuild the badge with larger text
Save the .gcode File
- Press the save button on the middle top, and name your file with your name, a description, and the color you want, e.g.
paul badge black.gcode
| 3D Print Training Series | |
|---|---|
| Previously: Making the 3D Printing Badge | Next up: Using OctoPrint |


